"Recently, a social media follower asked if I ever get tired of cooking from scratch. The answer? Absolutely not!" says baker and author Betül Tunç in her cookbook Turkuaz Kitchen: Traditional and Modern Dough Recipes for Sweet and Savory Bakes.
And if you're also into embracing that "everything should be homemade" energy, a dumpling project should be at the top of your list. We love Tunç's chicken dumpling recipe because it has an added challenge: She's carefully crafted instructions for homemade dumpling wrappers, so that every bite of this marvelous dish will be made from scratch at your kitchen table.
"Making your own dumpling wrappers might seem daunting," Tunç explains, "but it’s not as tough as you think. With a pasta roller at hand, you’re set to make any dumplings your heart desires." (That said, she's also got advice for proceeding if you've yet to nab a pasta roller of your own.)
As Tunç mentions, you can fill your wrappers with any concoction under the sun. But we're dishing up her expertly seasoned chicken dumplings. "These scrumptious treats are one of those recipes that can be turned into a delightful family activity, with each step enjoyable in its own way," Tunç points out, and we agree that dumpling folding is a great group project for friends and family of all ages.
Another perk of homemade dumplings? They freeze beautifully: "If you’re someone who takes comfort in having ready meals in the freezer for emergencies, you can easily make a batch over the weekend and store them for later." (That is, if you and your loved ones don't devour them as soon as they cool down.)
Dumpling Wrappers
Makes 35 to 40 wrappers
Ingredients
- 1 teaspoon salt
- 1⁄4 teaspoon granulated sugar
- 3⁄4 cup plus 2 tablespoons (195g) warm water, plus more if needed
- 3 cups (390g) Type “00” or all-purpose flour
- Cornstarch, for dusting
Instructions
- In a small bowl, mix together the salt, sugar, and water until dissolved. In a medium bowl, combine the flour and the sugar/salt mixture. Using your hand shaped as a claw, bring the dough together, stirring and squeezing the dough periodically for 2 to 3 minutes. Transfer the dough to a work surface. Using your hands, perform the basic kneading technique for 4 to 5 minutes. The dough will be a little dry and won’t look perfectly smooth at the end of this process, but don’t worry. Cover with plastic wrap and let rest at room temperature for 30 to 40 minutes.
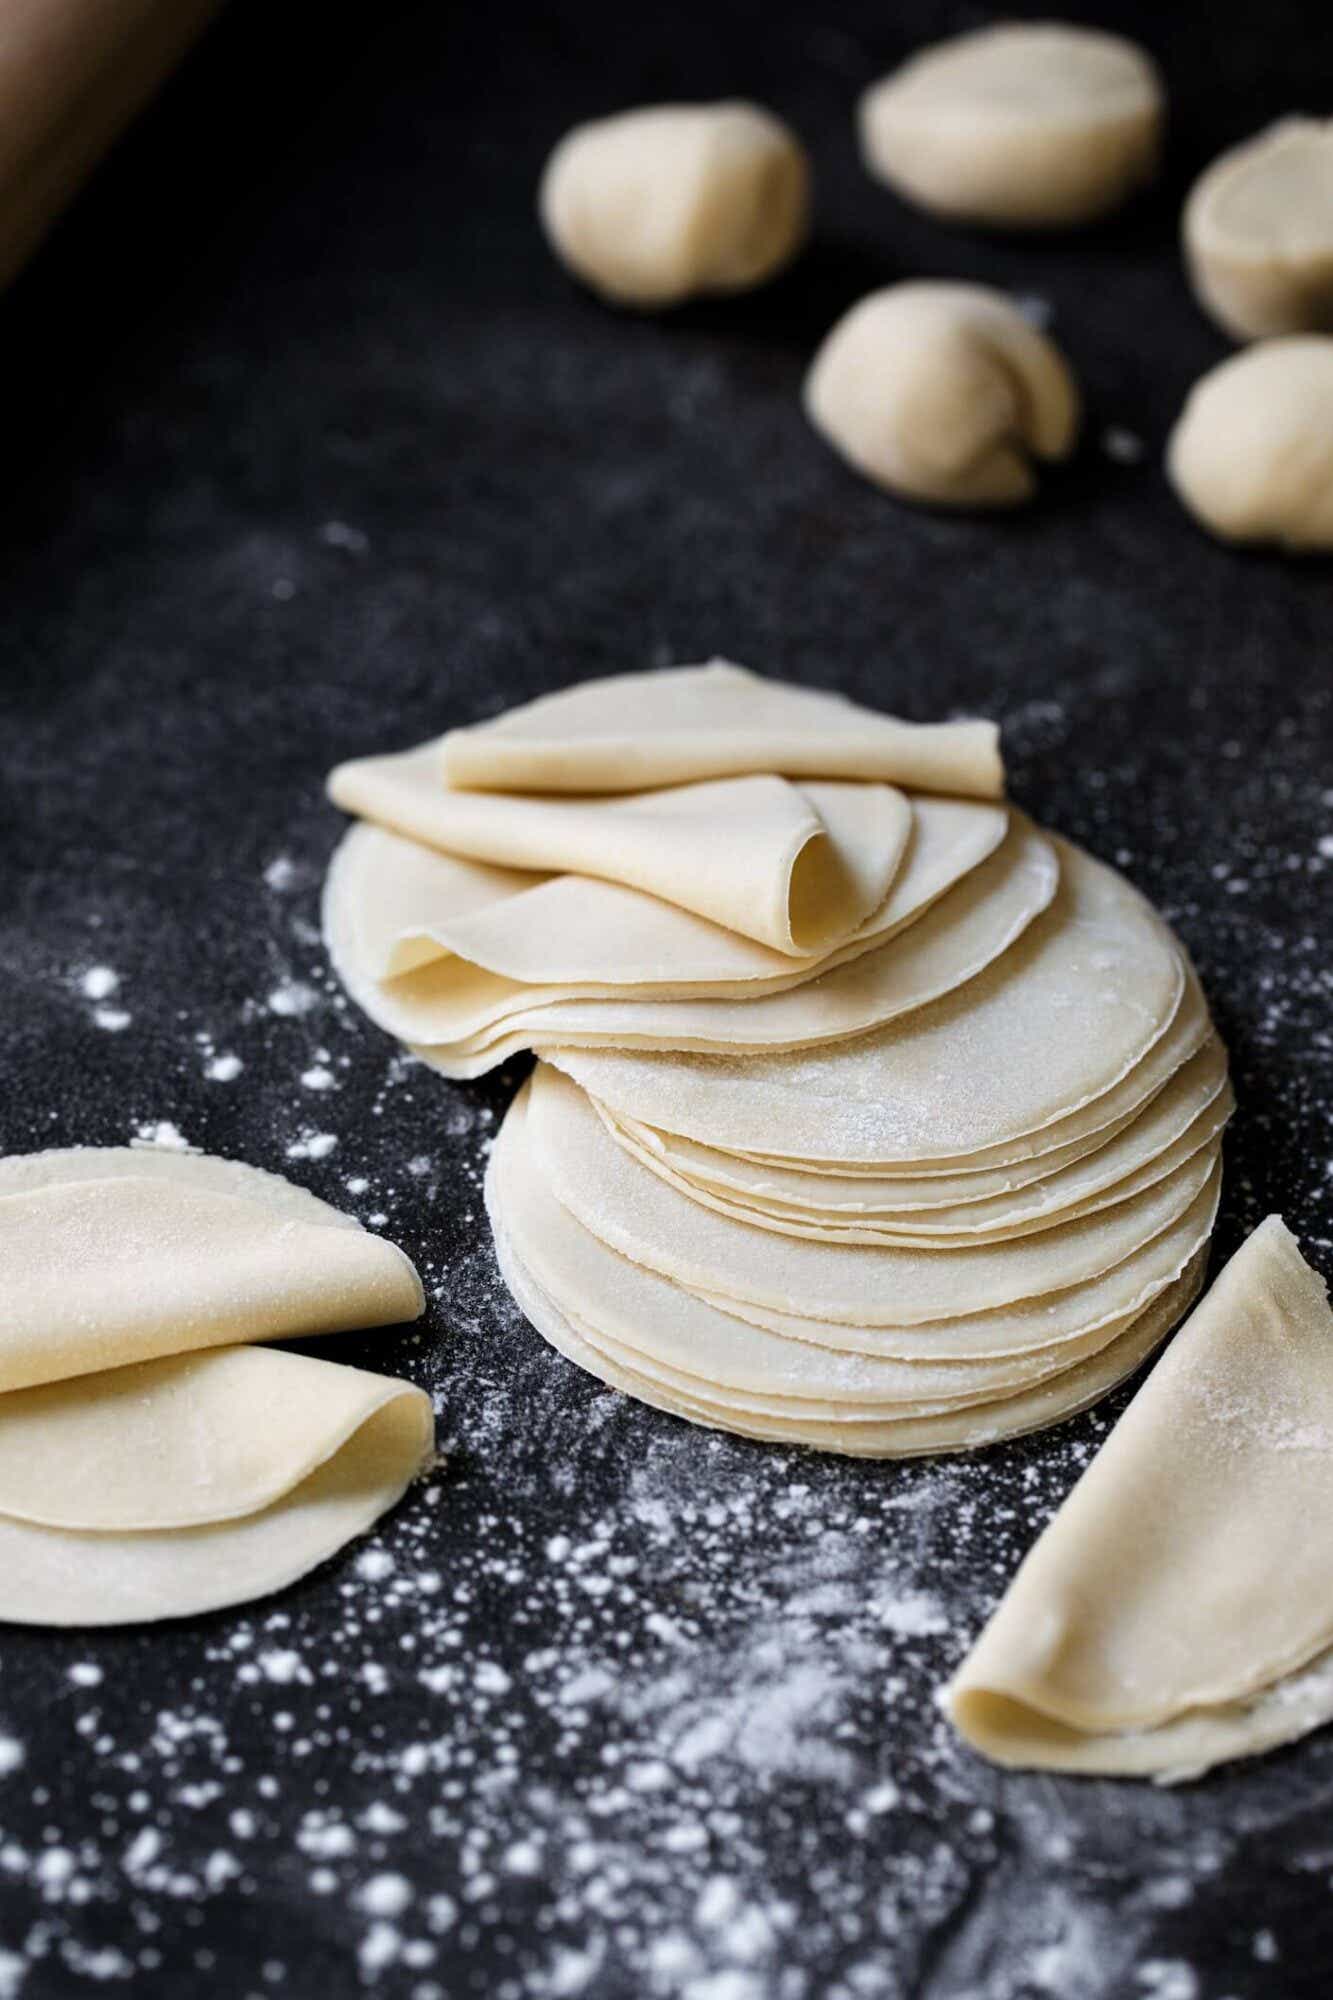
- After resting, knead for 4 to 5 minutes, until smooth and elastic. Cover with plastic wrap and let rest at room temperature for 1 hour or up to 4 hours. Set the dough on a work surface and knead for 1 to 2 minutes until smooth. Roll the dough into a log and use a sharp knife to divide into 4 equal portions. Round each piece of dough into a smooth ball. Place the balls on a floured plate and cover the plate loosely with plastic wrap.
- Place a ball of dough on the work surface. Using a rolling pin, roll into a 3 × 6-inch oval. Starting at the thickest setting of a pasta roller (1 on a KitchenAid), roll the dough, decreasing the thickness each time, until you reach setting 6 on a KitchenAid. (If the dough sticks while rolling, lightly dust the sheets with cornstarch.) Lightly dust a work surface and the top of the dough sheet with cornstarch, spreading it evenly. Using a 3 1/2 to 4-inch round cookie cutter, cut the dumpling wrappers, stacking them on a plate loosely covered with plastic wrap to keep them from drying out. Repeat with all the dough. Gather all the scraps into a ball and repeat the rolling and cutting process one more time. Your wrappers are now ready to be used in your favorite dumpling recipe.
Notes
- If you don't have a pasta roller or prefer to roll wrappers by hand, you can roll the dough into an 18-inch rope and divide it into 15g pieces. On a lightly floured or cornstarched surface, use a rolling pin to roll each piece into a 3½-inch round. Follow the rest of the recipe as written.
- If not making dumplings immediately, you can place the four balls of dough into an airtight container or storage bags rather than on a plate. Keep dough in the fridge for up to 2 days and then let sit until almost room temperature, about 30 to 45 minutes, before shaping.
Chicken Dumplings
Serves 4 to 6
Instructions
CHICKEN FILLING
- 1 pound ground chicken thighs
- 1⁄4 medium head napa cabbage, shredded
- 1 small onion, finely diced
- 2 garlic cloves, minced
- 1 carrot, grated
- 1 1⁄2 teaspoons minced fresh ginger
- 2 to 3 green onions, chopped
- 1⁄2 cup chopped fresh cilantro
- 1 tablespoon plus
- 1⁄2 teaspoon sesame oil
- 3 tablespoons peanut oil
- 1 teaspoon kosher salt
- 1 teaspoon freshly ground black pepper
- 1 tablespoon soy sauce
DUMPLINGS
- Egg white (optional)
- Sesame seeds (optional)
- Extra-virgin olive oil, for cooking
- Warm water, for cooking
DIPPING SAUCE
- 1⁄2 cup soy sauce
- 1⁄4 cup water
- 1 tablespoon chili oil
- 2 teaspoons sesame oil
- 2 teaspoons rice vinegar
- 2 teaspoons honey
- 2 small garlic cloves, minced
- 2 tablespoons sesame seeds, toasted
- 4 scallions, chopped, for garnish
Ingredients
- Make the dumpling wrappers as directed.
- Prepare the chicken filling: Spread the chicken in a large bowl. Sprinkle the napa cabbage, onion, garlic, carrot, ginger, green onions, and cilantro on top of the chicken, but do not mix. In a small saucepan, heat the sesame and peanut oils together over medium heat. Once the oil is very hot, remove from the heat and pour directly over the vegetables. Add the salt, pepper, and soy sauce. Using a wooden spoon or your hands, stir thoroughly until the mixture is well combined and has an almost paste-like consistency.
- Prepare the dumplings: Set the dumpling wrappers on a clean work surface. Place 2 tablespoons of the chicken filling in the middle of a dumpling wrapper. Dip your finger in water and moisten the outer edge of the wrapper. Fold the wrapper in half and press the edge to seal. Starting from the left corner, pinch together the edge with the forefingers and thumbs of both hands. Moving right across the top of the dumpling, pinch the outer edge with your left hand while lightly folding the dough over it with the fingers of the right. This will create the traditional wave pattern. Pinch tightly as you go to ensure a tight seal. Once completely sealed, lightly flatten the bottom of the dumpling so it can sit upright. Place on a baking a sheet and cover loosely with plastic wrap. Repeat this process with each wrapper.
- Once finished, if extra crunch is desired, use your finger to lightly moisten the bottom of the dumplings with water or egg white and dip in sesame seeds.
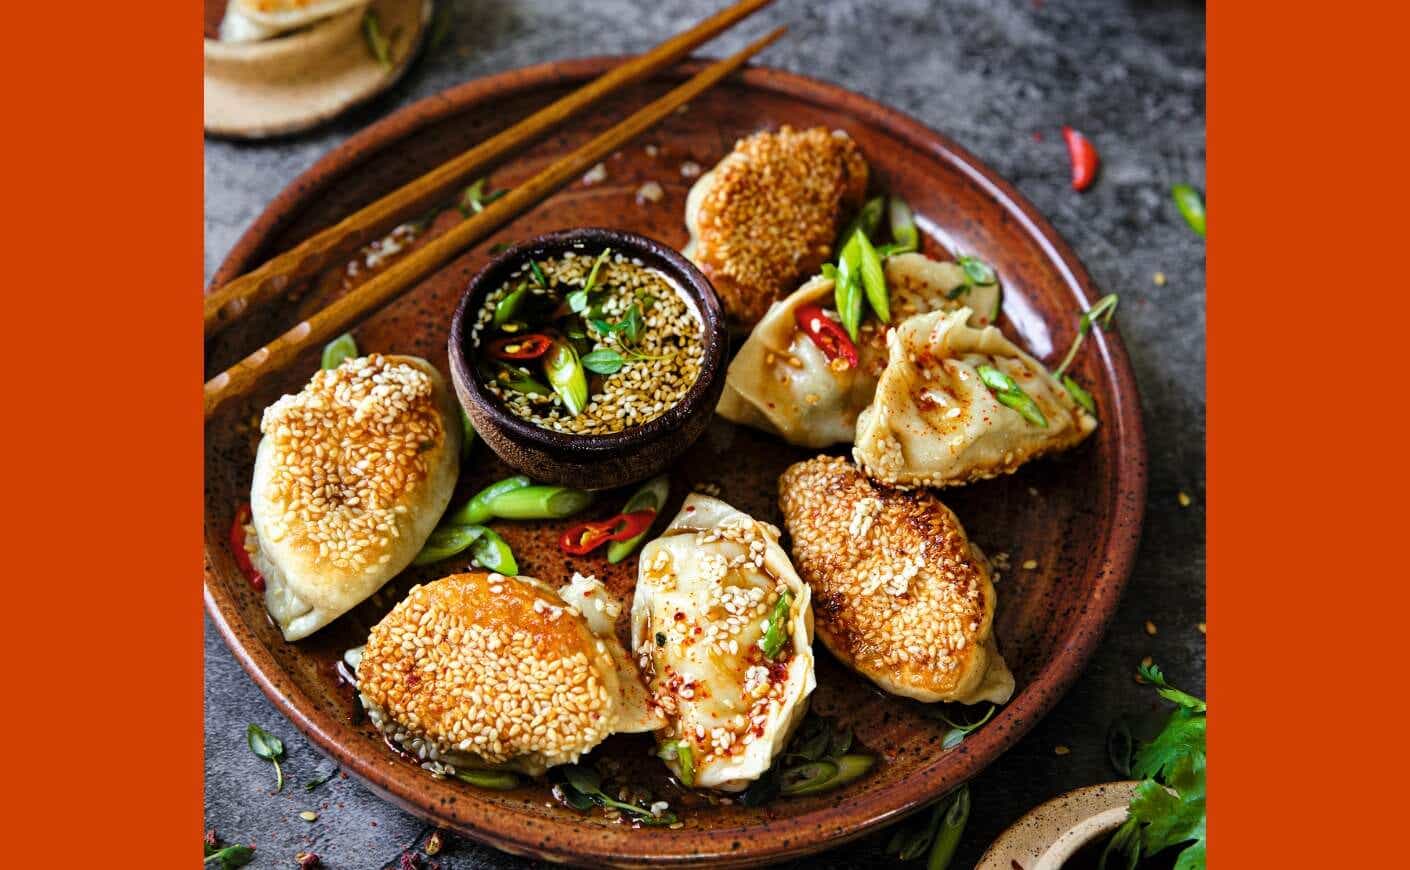
- In a large nonstick skillet, heat 2 tablespoons of olive oil over medium heat. Working in batches of 10 to 12 dumplings (so they do not touch), sear the bottoms for 2 to 3 minutes while watching. Add 1⁄4 cup of warm water and immediately cover with a lid. Reduce the heat to medium-low and cook until the dumplings are tender and the water has evaporated, 8 to 10 minutes. Remove from the heat and place on a plate. Repeat with the remaining dumplings, using 2 tablespoons of oil and 1⁄4 cup of warm water per batch.
- Make the dipping sauce: In a small bowl, mix the soy sauce, water, chili oil, sesame oil, vinegar, honey, garlic, and sesame seeds. Serve the hot dumplings with dipping sauce on the side and garnish with scallions.
Note: If not cooking immediately, you can place the filled dumplings on a baking sheet lined with parchment paper, cover with plastic wrap, and freeze for 2 hours. Once frozen, place them in an airtight storage bag and keep in the freezer for up to 3 months. To cook, follow the instructions but add 1 to 2 additional minutes to ensure they cook through.
Reprinted with permission from Turkuaz Kitchen: Traditional and Modern Dough Recipes for Sweet and Savory Bakes by Betül Tunç. Copyright © 2024 by Betül Tunç. Photographs copyright © 2024 by Betül Tunç and Gentl and Hyers. Published by Ten Speed Press, an imprint of the Crown Publishing Group, a division of Penguin Random House LLC, New York.